Introduction to Composite Concrete Design
Eugene Washington,
P.E.
Course Outline
1. Design for three
stages of loadings
2. Design Prestressed girder for dead load only
3. Girder camber
4. Light weight concrete properties
5. Prestress losses
6. Apply slab dead load weight
7. Girder diaphragms
8. Differing material modulus
9. Apply live loadings
10. Check for shear
Learning Objectives
This course leads the reader through the step by step process required to design a composite slab and beam system. The basic formulas for design are given with an explanation as why they are used and how they are applied. The purpose of this course is to give an insight and understanding of the process of composite concrete design and construction procedures.
Course Introduction
Composite concrete structures are where different materials are bonded to the concrete to form a combined structural shape. The most common example is when a reinforced concrete deck slab is poured on top of a prefabricated beam. The beams are usually concrete girders or steel beams. Other examples include timber, trusses and even polymer materials. Composite applications are often seen in bridges, buildings and parking structures. This course explains to the reader the major steps and formulas needed to design for composite beam construction.
There are several advantages of composite structures. By bonding the beam and deck together the structure can be designed lighter, stronger and stiffer than when the beam and deck act independently. The cost savings result from a lighter structure and faster construction. Often the deck slab soffit forms are attached to the beams, eliminating expensive falsework. The composite design technique is used for bridges where traffic, deep water, steep canyon or environmental concerns makes falsework impractical. Bridge beams can be precast, prestressed AASHTO concrete girders or steel girders. Parking structures are often almost entirely precast except for footing and topping slabs. Even the deck soffit forms can be eliminated by the use of precast, prestressed double tee girders.
Course Content
Girders must be designed for three major stages. The first stage is when the girders are erected. The second stage is the placing of the concrete deck slab. The third stage is applying the live loads to the finished structure. The internal stresses accumulate in the girder from each stage of design.
Often the girders must have temporary lateral bracing installed so that they can be picked and crane erected without collapsing before the permanent design bracing can be installed. Both long span concrete and built-up steel girders are vulnerable to wind loads and lateral instability until the design structure is completed. Prestressed concrete girders resist the prestress load only by their dead weight. Prestressed girders must be crane picked near the extreme ends and the suspending cables must be vertical. The increased compression and bending load induced by a sling type rigging can cause a catastrophic rupture of the girder. The girder must be kept upright and nearly level when being handled because even a slight mis-orientation of the dead load of the girder can induce instant collapse of the girder. Such disasters usually result in major project delays, cost overruns and can result in death. The same concerns apply to long span built up steel girders.
The American Concrete Institute (ACI) publishes several definitive manuals, including ACI - 318, that define the concrete design procedures and calculations. Their guidelines are the result of extensive studies, tests, theory and research. The design engineer must be fully cognizant of the ramifications and all the appropriate design checks needed to competently design prestressed concrete girders. Further reference is made to ASTM and ASSHTO for material properties and design load criteria.
Prestressed concrete girders are a delicate design compromise where the prestress compression and bending moment are just countered by the dead weight of the girder. The added dead loads and live load subsequently will cause a tension in the bottom fiber nearly equal to the induced prestress compression. The design allows the girder to remain in total compression at all times.

W = Girder Dead Weight, lb/in
P = Prestress Force, lbs
The stresses are combined to place the top concrete fiber of the girder at nearly zero stress and the bottom concrete fiber compression just below the allowable concrete compressive stress. Several points in the girder are checked to insure the girder is not over stressed at any point.
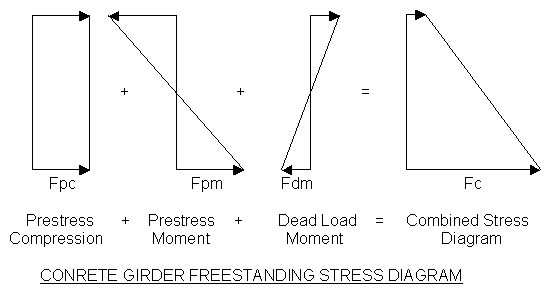
Fpc = P/A, psi
Fpm = PY/Sx, psi
Fdm = [WLX^2/2 - WX^2/2]/Sx, psi
Fc = Fpc + Fpm + Fdm, psi
A = the concrete girder cross section area at the analysis section, sqin
L = concrete girder clear span between supports, inches
P = the prestress force at the analysis section, lbs
Note: The prestress force is reduced due to the all of the various actions of bond length and shortening reactions
Sx = the Concrete girder Section Modulus at the analysis section, cin
Note: It is common for the girder section to be asymmetrical vertically and that causes the upper Section Modulus to have a different value than the lower Section modulus.
W = concrete girder weight , lb/in
Note: The equations shown here assumes a constant section for the entire girder length
Y = the prestress eccentricity from the girder neutral axis at the analysis section, inches
X = the distance from the support to the analysis section, inches
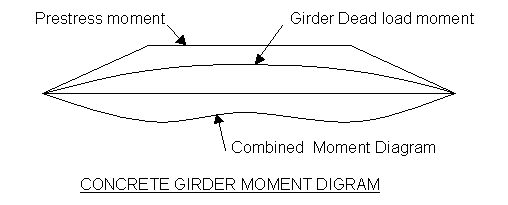
Several points in the girder are checked to insure the girder is not over stressed at any point. The reason for this is the prestress is usually harped strands that only approximates the parabolic dead load curve and the critical stress point will not be at the center of the girder. The top concrete fiber must be checked to make sure no significant tension is created. The bottom concrete fiber is checked to insure the concrete is not overstressed in compression. The harping of the prestress strands will induce a significant shear in end quarter portions of the girder. The sine of the slanted portion of the prestress force less the dead load shear must be check to insure the concrete is not overstressed in shear.
The prestressed girders will develop a very large vertical camber. This camber develops from two sources. First the prestress force is designed to support the full superstructure dead load including the girder, deck, diaphragms, bridge rails, sidewalks, medians and future toppings as well as traffic live loads, impact, and dynamic wind and earthquake loads plus all the associated safety factors. This means the girder will naturally assume a significant upward camber as soon as the prestress force is applied.
The second camber source is creep. Usually the girders are cast with the prestress force being resisted by structures that are external and independent of the girder. The girder is then steam cured overnight at a temperature of about 180 degrees Fahrenheit. This high heat will cure the concrete to at least the 14 day normally cured strength. The prestress tension is then released and the girder absorbs the prestress force through the bond strength between the prestress strand and the concrete. As the girder continues to age and cure the induced differential compressive stress causes the lower portion of the beam to shrink or creep much more than the lightly compressed upper half of the girder. This increases the initial upward camber and slightly relaxes the prestress force. The creep effect can easily double the initial prestress induced camber.
The creep camber can be controlled by placing heavy designed weights on the girder until it is shipped for erection. The initial upward deflection caused by the prestress force can be approximated by the equation:
D = 5[Wp-Wd]L^4/384EcIx
D = deflection at the girder center line, inches
L = span length between supports, inches
Ec = Concrete Modulus of elasticity, psi
Ix = Concrete Moment of Inertia, qin (inch^4)
Wd = concrete girder weight, lb/in
Wp = 8PY/L^2, lb/in This converts the prestress moment to an equivalent uniform load.
P = the prestress force at the girder centerline, lbs
Y = the prestess force eccentricity from the neutral axis at the girder centerline, inches
Lightweight concrete can be particularly susceptible to long term creep. I know
of a lightweight post-tensioned concrete bridge in California that had to be
retrofitted with extensive post-tensioning to correct a two foot sag. Lightweight
concrete has the advantage of a much reduced structural dead load, but that
reduced weight is often offset by weaker strength, reduced durability and high
creep properties. Generally, lightweight concrete is not commonly used in structural
bridge applications.
The prestress losses are generated by four phenomenon. First, the strand relaxes as the prestress force is transferred to the girder concrete. Second, the concrete girder shortens under the prestress force, further relaxing the strand. Third, the concrete shrinks as it continues to age and shortens the strand length. Fourth, the stress creep causes the strand to further relax and lose tension. These action combine to significantly reduce the initial prestress forces.
The girders and diaphragms are separated from the abutments and pier caps using neoprene bearing pads, Styrofoam and expansion joint filler. This done to allow the superstructure to freely rotate under differing load conditions. It also is designed to allow the superstructure to expand and contract due to the anticipate extremes in temperature. Both ends of the girders are restrained laterally by concrete shear blocks. The girders are restrained only at one end by longitudinal shear blocks. This allows a free expansion and contraction. In earthquake prone areas the superstructure is often restrained by flexible cable systems both longitudinally and vertically.
The second step is to apply the deck slab dead load. Usually it is assumed that the deck soffit forms are supported by the girder. That means the slab concrete dead load weight will be carried by the girder. Only after the deck concrete is sufficiently cured will the deck and the girder act as a single structural member to carry the live and dynamic loads. Unless the soffit is a stay-in-place form, the form weight and construction live loads can usually be ignored at this stage.
The only construction live load concern is the point loads generated from concrete finish machines. These machines ride on pipe rails and finish the deck surface to the defined grade and slope. Often the deck slab is cantilevered a few feet past the outside girder. If the finish machine rails are placed on the outside longitudinal deck edge forms, a torque is introduced to the outside girder by the weight of the finish machine. Concrete girders and steel beams are very easily overstressed and deflected by torque forces. One solution is to mount the finish rails on the vertical centerline of the outside girders to eliminate any significant torque. Another solution is to temporarily cross brace to the next inside girder often enough to control torque deflection. Any time the girders are anticipated to absorb torque forces, even fairly light loads, the torque effect should be analyzed for stress and twist deflection.
For composite bridge designs intermediate diaphragms are cast between the girders and below the deck slab. The diaphragms serve at least two purposes. They support the bottom flange of the girder to resist lateral loads such as wind and earthquake forces. They also tie the girders together so that the girders will deflect as unit when asymmetrical traffic loads to some girders and not load the adjacent girders. For long spans the girders can deflect enough to overstress the slab that has a short span between the girders. The differential deflections are analyzed by assuming fixed end slab moments develop at the edge of the girder. The diaphragms are spaced to eliminate any significant differential girder deflection under asymmetrical bridge loadings. End diaphragms are cast to lock the girders for lateral stability.
These diaphragms are usually cast before the deck and allowed to take at least an initial set. This procedure is recommended to control the tendency for a shrinkage crack to develop between the interface between the deck and diaphragm concrete.
The deck slab uniform weight is added to the freestanding girder and the resulting stress change is calculated. The deflection due to the deck slab concrete weight must also be calculated and added to the finish deck elevations.
Fsm = [WsLX^2/2 - WsX^2/2]/Sx, psi
Fd = Fc + Fsm, psi
L = concrete girder clear span between supports, inches
Sx = the concrete girder Section Modulus at the analysis section, cin
Note: It is common for the girder section to be asymmetrical vertically and that causes the upper Section Modulus to have a different value than the lower Section modulus.
Ws = concrete deck slab weight , lb/in
Note: The equations shown here assumes a constant section for the entire girder length
X = the distance from the support to the analysis section, inches
After the deck has sufficiently cured to design strength, the live loads can be applied to the composite deck girder structural unit. The outer girders of a bridge usually support only one-half of a traffic lane and a smaller slab section, but also carries the bridge barrier rail and/or sidewalk. Usually the difference between the extra dead load on the exterior girder and the full traffic loads on the interior is small enough that separate girder designs are not required.
The third step in the design process is to determine the combined or composite section properties and calculate the live load stresses:
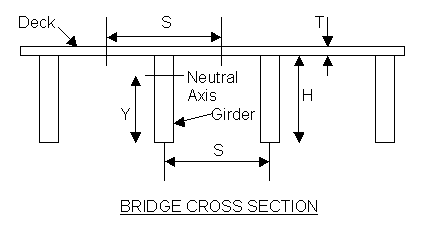
H = the girder height, inches
Note: Often there is a positive elevation difference of about three to six inches designed between the deck soffit and the high point of the girder camber. This is to allow for the inability to accurately predict creep camber.
S = the spacing of the girders and the contributing deck width, inches
Note: Usually the deck slab is thick enough and the girder spacing is small enough that no slab width reduction is required, but reference to the ACI-318 criteria is prudent.
T = the total thickness of the deck, inches
Note: The thickness should be reduced by the depth of expected wear. Reduction
for the rebar cover is not necessary because the slab will usually be entirely
in compression longitudinally by the live loads.
Y = the composite neutral axis, inches
In order to locate the neutral axis the Modulus of Elasticity of the girder and the concrete must be factored.
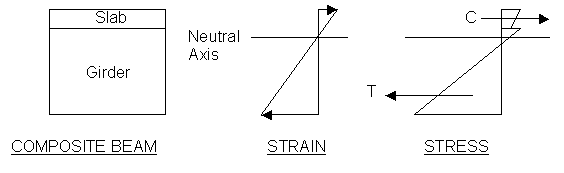
When the composite beam bends under load it is assumed that the strain is linear, zero at the neutral axis with a fixed slope to the outermost concrete fibers. The compression force must equal the tension force. Even prestressed girders can have a different Modulus of Elasticity from the from the deck slab concrete. The reason is that the girder concrete my be a 6,000 psi mix design and the deck slab concrete may be as low as a 3,000 psi mix design.
F = DsE/L, psi
Ds = Strain, inches
E = Modulus of Elasticity, psi
F = tensile or compressive Force, psi
L = Member length, inches
N = Eg/Es
Eg = the girder Modulus of elasticity, psi
Es = the deck slab Modulus of elasticity, psi
N = Modulus factor the different material properties of elasticity, dimensionless
Y = [NAgYg +AsYs]/[NAg + As]
This formula converts the girder area to an equivalent deck slab concrete strength to account for the different stress to strain relationships between the girder concrete and the slab concrete.
Ag = girder Area, sqin
As = deck slab area, sqin
Y = distance from the composite beam centroid from the bottom of the girder, inches
Yg = distance to the girder centroid form the bottom of the girder, inches
Ys = distance to the deck slab centroid from the bottom of the girder, inches
Now the Moment of Inertia can be calculated about the composite beam neutral axis:
Ic = Ig + Is + Ag[Y-Yg]^2 + As[Ys-Y]^2
Ic = the composite beam Moment of Inertia, qin
Ig = the girder Moment of Inertia about its own centroid, qin
Is = the deck slab Moment of Inertia about its own centroid, qin
The compression or upper Section Modulus and the tensile or lower Section modulus of the composite beam is calculated:
Sc = Ic/Yc, cin
St = Ic/Y, cin
Yc = the distance from composite beam centroid to the deck slab top most fiber, inches
Sc = the compression Section Modulus, cin
St = the tensile Section Modulus, cin
The live load induced stresses are then calculated be the formulas:
Fc = Me/Sc
Ft = NMe/St
Fc = the live load maximum compressive stress in the deck slab, psi
Ft = the live load maximum tensile stress in the girder, psi
Note: N is used to convert the prestressed girder back from the deck slab Modulus
of Elasticity used to determine the composite beam Moment of Inertia and the
Section Modulus.
Me = the various live load moments used for designing the structure, in-lbs
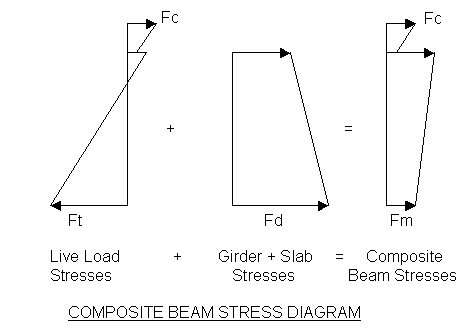
The live load stress are now added to the concrete girder + deck slab stress diagram:
The final check is for shear loading. Usually the web of the girder is assumed to carry all the dead and live load shear to the bridge bearings. The girder webs are often thickened and stiffened near the ends to resist the high shear levels. The shear flow in the slab and the interface between the deck and the girder must be checked. Usually additional stirrups or shear studs are required to resist the shear forces. For the girder the shear is calculated by the formula:
v = VAw
v = the shear stress, psi
V = the dead plus live load shear at the various points an analyzed, lbs
Aw = the girder web area, sqin
Shear flow for the deck slab is calculated by the formula
Vf = VQ/Ic
Ic = the Moment of Inertia of composite beam cross section at the point used, qin
Q = AsXc, cin
As = the area of the slab outside the shear plane, sqin
Xc = the vertical distance from the composite beam centroid to the centroid of As, inches
V = the live load only shear at the cross section being analyzed, lbs
Vf = the live load shear flow, lbs/inch
The area of shear reinforcement is calculated by the formula:
Ar = SfVfSs/KpUFy
Ar = the area of the steel stud or stirrup rebar, sqin
The steel area can be the accumulated area of several bars placed in a transverse row.
Kp = the shear load reduction factor, ACI-318 recommends Kp = 0.85
Fy = the yield strength of the steel stud or rebar, psi
Sf = the ultimate stress safety factor, ACI-318 recommend at least Sf = 1.7
Ss = the stud or rebar longitudinal spacing, inches
U = the coefficient of friction between the girder and the deck slab
The coefficient of friction will vary considerably depending on the girder material and roughness of the girder top surface, see ACI for the various recommended values.
The longitudinal area of the slab cross section over girder should be checked to insure the transverse rebar or concrete area is sufficient to resist the shear flow induced by the live load bending of the composite beam.
Course Summary
This introductory course shows the basic procedures necessary to develop a composite beam design. The primary example used is the common AASHTO precast, prestressed concrete girder. The shown procedures are also applicable to steel beams and girders by using the steel properties. A thorough knowledge of ACI recommendations for concrete and concrete girders is required to completely design the concrete elements of the bridge. When steel girders are used the recommendations of AISC (American Institute of Steel Construction) must be followed. Federal, State and local standards often must be employed. By following the step by step procedure listed an accurate determination of the stresses that occur can easily be calculated and the composite beam quickly designed. This is especially true if a computer design program is utilized.
Additional Resources
1. Building Code Requirements for Structural Concrete (ACI 318-95)
2. Reinforced Concrete Design, 1965 by Chu-Kia Wang and Charles G. Salmon
3. Handbook of Heavy Construction, 2nd edition, 1971 Edited by John A. Havers and Frank W. Stubbs, Jr.
4. Concrete Manual, 1981 US Bureau of Reclamation
***
Once you finish studying the above course content, you need to take a quiz to obtain the PDH credits.
***
DISCLAIMER: The materials contained in the online course are not intended as a representation or warranty on the part of PDHonline.com or any other person/organization named herein. The materials are for general information only. They are not a substitute for competent professional advice. Application of this information to a specific project should be reviewed by a registered professional engineer. Anyone making use of the information set forth herein does so at their own risk and assumes any and all resulting liability arising therefrom.
